
No-Bake Chocolatey Peanut Butter Bliss Bites
In recent years, no-bake desserts have surged in popularity, captivating the taste buds of health-conscious individuals and dessert lovers alike. These delightful treats offer the perfect solution for those looking to satisfy their sweet tooth without the hassle of preheating an oven or spending hours in the kitchen. Among the myriad of no-bake creations, the No-Bake Chocolatey Peanut Butter Bliss Bites stand out as a quick, healthy, and utterly delicious option. With their rich flavor profile and simple preparation, they are ideal for anyone seeking an easy yet satisfying snack.
This recipe not only caters to the craving for something sweet but also prioritizes wholesome ingredients that contribute to a balanced diet. Whether you’re a busy parent looking for a nutritious after-school snack for the kids or an adult in need of a guilt-free treat to enjoy with your afternoon coffee, these bliss bites deliver on all fronts. The appeal lies in their effortless preparation—just mix, roll, and chill—and the ability to customize them to suit your taste preferences.
Understanding the Ingredients
To truly appreciate the No-Bake Chocolatey Peanut Butter Bliss Bites, it’s essential to understand the ingredients that make them both tasty and nutritious. Let’s take a closer look at each component and what it brings to the table.
Natural Peanut Butter
One of the star ingredients in this recipe is natural peanut butter, which sets the foundation for the rich, nutty flavor that makes these bites irresistible. Unlike conventional peanut butter brands that often contain added sugars, hydrogenated oils, and preservatives, natural peanut butter is made from just peanuts (and sometimes a touch of salt). This not only results in a more authentic taste but also retains the essential nutrients found in peanuts.
Opting for natural peanut butter comes with a plethora of health benefits. It is rich in protein, healthy fats, and essential vitamins and minerals, making it a nourishing choice for both kids and adults. When selecting your peanut butter, you can choose between smooth and crunchy varieties. Smooth peanut butter creates a creamy texture, while crunchy peanut butter adds delightful bits of peanuts that provide an extra layer of texture to the bliss bites.
Sweeteners: Honey vs. Maple Syrup
Sweetness is a crucial factor in any dessert, and with these bliss bites, you have the option to use either honey or maple syrup as your sweetener. Both options have their unique flavor profiles and health benefits. Honey, a natural sweetener, is known for its antibacterial properties and can provide a quick energy boost, making it a favorite among athletes. On the other hand, maple syrup is packed with antioxidants and minerals, such as manganese and zinc.
The choice between honey and maple syrup ultimately comes down to personal preference and dietary restrictions, as honey is not considered vegan. Additionally, you can adjust the sweetness level of the bites based on your taste, making it easy to tailor the recipe to your liking.
Rolled Oats
Whole grain rolled oats play a significant role in the No-Bake Chocolatey Peanut Butter Bliss Bites, providing both texture and nutritional benefits. Oats are a fantastic source of dietary fiber, which is essential for digestive health. They also help to keep you feeling full longer, making these bliss bites a great option for a satisfying snack.
Incorporating rolled oats into this recipe not only enhances the overall texture but also contributes to the nutritional profile. Whole grains like oats are known to lower cholesterol levels and stabilize blood sugar, making them a smart choice for a health-conscious treat.
Unsweetened Cocoa Powder
Cocoa powder is another key ingredient that elevates these bliss bites from simple to sublime. Unsweetened cocoa powder is brimming with health benefits, including a high concentration of antioxidants known as flavonoids. These powerful compounds can help reduce inflammation and improve heart health.
Moreover, cocoa powder adds a rich chocolate flavor that complements the creaminess of the peanut butter, making each bite indulgent without being overly sweet. The bitterness of the cocoa balances the sweetness of the other ingredients, creating a harmonious flavor profile that chocolate lovers will adore.
Chocolate Protein Powder (Optional)
For those looking to boost the protein content of their snacks, adding chocolate protein powder is an excellent option. This ingredient not only provides an additional layer of chocolate flavor but also increases the overall nutritional value of the bliss bites. Protein is essential for muscle repair and growth, making these bites a great post-workout snack.
When choosing a protein powder, look for high-quality options that are free from artificial additives. Whey protein, plant-based protein, and casein protein are all suitable choices. The type of protein powder you select can vary based on dietary preferences, such as vegan or lactose-free options.
Mini Chocolate Chips
No dessert would be complete without a touch of chocolate, and mini chocolate chips add the perfect finishing touch to these bliss bites. The joy of incorporating chocolate into snacks cannot be overstated. It enhances flavor and brings an element of indulgence that makes these bites feel like a treat.
When selecting chocolate chips, you can choose between semi-sweet and dark chocolate varieties. Semi-sweet chocolate chips provide a classic sweetness, while dark chocolate chips offer a more intense chocolate flavor with additional health benefits, such as higher antioxidant levels. Regardless of your choice, mini chocolate chips are a delightful addition that will satisfy chocolate cravings.
Vanilla Extract and Sea Salt
Finally, the addition of vanilla extract and a pinch of sea salt rounds out the flavor profile of the No-Bake Chocolatey Peanut Butter Bliss Bites. Vanilla extract is known for its ability to enhance the flavors of other ingredients, creating a more complex and enjoyable taste experience. It adds warmth and depth that complements the peanut butter and chocolate beautifully.
Sea salt, on the other hand, plays a crucial role in balancing sweetness. A small sprinkle of sea salt can elevate the flavors and make the sweetness pop, creating a more satisfying and well-rounded treat. The combination of sweet and salty is a classic pairing that takes these bliss bites to the next level.
Initial Steps to Create Your Bliss Bites
Now that you have a comprehensive understanding of the ingredients and their benefits, let’s dive into the initial steps of preparing your No-Bake Chocolatey Peanut Butter Bliss Bites.
1. Gather Your Ingredients: Start by collecting all the necessary ingredients: natural peanut butter, honey or maple syrup, rolled oats, unsweetened cocoa powder, optional chocolate protein powder, mini chocolate chips, vanilla extract, and sea salt. Having everything ready will streamline the process.
2. Mix the Base: In a large mixing bowl, combine the natural peanut butter and your choice of sweetener (honey or maple syrup). Stir them together until well blended. If you’re using chocolate protein powder, add it to the mixture at this stage.
3. Incorporate Dry Ingredients: Next, gradually add the rolled oats and unsweetened cocoa powder to the bowl. Mix until everything is evenly combined. The mixture should be thick and sticky, making it easy to form into bites.
4. Add Chocolate Chips and Flavoring: Once the dry ingredients are fully incorporated, fold in the mini chocolate chips, vanilla extract, and a pinch of sea salt. The chocolate chips will provide bursts of sweetness and texture in every bite.
5. Form the Bites: Using your hands, take small portions of the mixture and roll them into bite-sized balls. Aim for a size that is easy to pop in your mouth—about one inch in diameter works well.
6. Chill to Set: Place the formed bliss bites on a baking sheet lined with parchment paper. Once all the mixture has been rolled into bites, transfer the baking sheet to the refrigerator. Allow the bliss bites to chill for at least 30 minutes to firm up.
This initial phase of preparation is straightforward and takes minimal time, allowing you to whip up a batch of these delectable treats in no time. The No-Bake Chocolatey Peanut Butter Bliss Bites are not only easy to make but also provide a satisfying and nutritious snack option that the whole family will love. Stay tuned for the next part of the article, where we will explore storage tips, variations of the recipe, and creative serving suggestions to elevate your bliss bite experience.
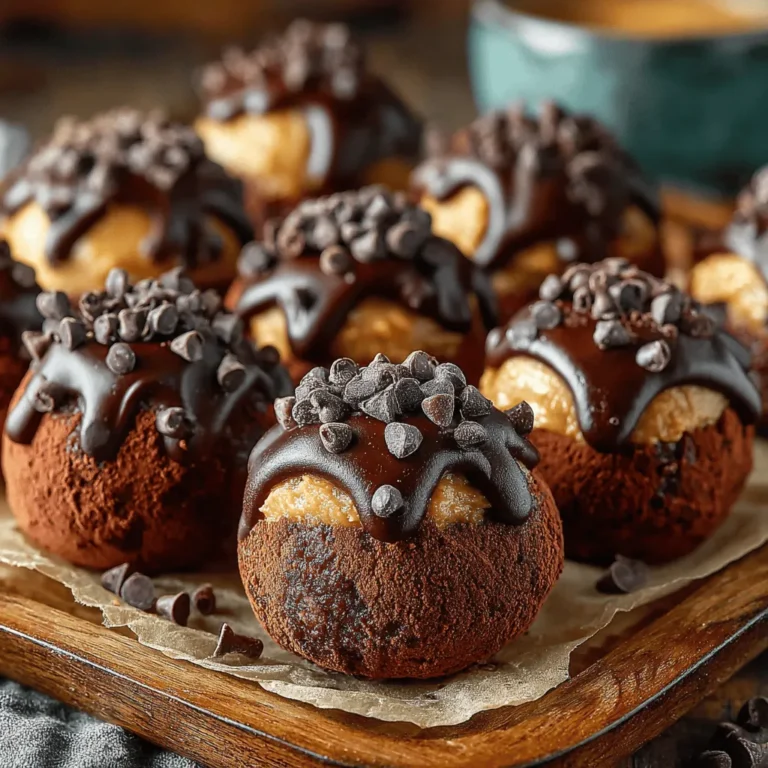
{{image_2}}
Role of Sea Salt in Balancing Sweetness
When crafting the perfect treat like No-Bake Chocolatey Peanut Butter Bliss Bites, one ingredient often overlooked is sea salt. This simple addition plays a crucial role in balancing the sweetness of the chocolate and the natural sugars from the peanut butter and honey or maple syrup. The contrast created by sea salt enhances the overall flavor profile, making each bite a delightful experience. Not only does it elevate the taste, but it also brings out the rich, nutty flavors of the peanut butter, ensuring that your bliss bites are not overly sweet.
Step-by-Step Instructions
Detailed Guide to Preparing the Mixture
1. Gather Your Ingredients: Start by assembling all necessary ingredients, including natural peanut butter, rolled oats, honey or maple syrup, vanilla extract, chocolate chips, and a pinch of sea salt.
2. Mix Wet Ingredients: In a large mixing bowl, combine the peanut butter, honey (or maple syrup), and vanilla extract. Use a spatula or wooden spoon to mix until the ingredients are well-blended and smooth. This step is essential as it ensures that the sweet and nutty flavors meld together.
Importance of Mixing Techniques for Achieving the Right Consistency
Achieving the right consistency is key to ensuring your bliss bites hold together well. When mixing your wet ingredients, ensure there are no lumps of peanut butter left unmixed. The smoother the mixture, the easier it will be to incorporate the dry ingredients without clumping.
Incorporating Dry Ingredients
1. Add the Oats: Gradually add the rolled oats to the peanut butter mixture. Using a spatula, fold the oats in gently to avoid overworking the mixture, which can lead to a dense texture.
2. Tips for Mixing Dry Ingredients Without Overworking the Mixture: Mix until just combined, ensuring that the oats are evenly distributed throughout the wet ingredients. Over-mixing can lead to tough bites, so it’s crucial to keep this step gentle and brief.
Adding Chocolate Chips
1. Incorporating Chocolate Chips: Once the oats are well incorporated, it’s time to fold in the chocolate chips. Make sure to use semi-sweet or dark chocolate chips for the best flavor.
2. Best Practices for Ensuring Even Distribution Without Melting the Chips: To avoid melting the chocolate chips, ensure the peanut butter mixture is not too warm. Gently fold in the chocolate chips until evenly distributed throughout the mixture, taking care not to break them.
Shaping the Bliss Bites
1. Techniques to Achieve Uniform Size and Shape for Consistent Texture: Using a cookie scoop or your hands, portion out the mixture into small balls, about 1-inch in diameter. Roll them between your palms to create a smooth surface.
2. Placing on a Baking Sheet: Lay the shaped bliss bites on a parchment-lined baking sheet, spacing them out to allow for chilling.
Chilling Process
1. Explanation of the Chilling Time and Its Importance: Once all the bliss bites are shaped, place the baking sheet in the refrigerator for at least 30 minutes. This chilling time is crucial as it allows the bites to firm up, making them easier to handle and enjoy.
2. After Chilling: Once chilled, the bites will have a firmer texture, making them the perfect treat to enjoy anytime.
Presentation Ideas
Creative Serving Suggestions
To enhance the visual appeal of your No-Bake Chocolatey Peanut Butter Bliss Bites, consider arranging them on a decorative platter. For a simple yet elegant presentation, dust the bites lightly with cocoa powder or drizzle melted dark chocolate over the top. This not only adds a beautiful contrast but also an extra layer of flavor.
Suggestions for Platters and Serving Styles to Enhance Visual Appeal
– Tiered Serving Stands: Use tiered stands to create an eye-catching display for parties or gatherings. Arrange the bliss bites by size or flavor variations for added visual interest.
– Garnishing with Fresh Fruit: Surround the bites with fresh strawberries or banana slices to add color and freshness to your presentation.
Nutritional Insights
Overview of the Health Benefits of Bliss Bites
No-Bake Chocolatey Peanut Butter Bliss Bites are not just delicious; they also offer numerous health benefits. Packed with protein from peanut butter and fiber from rolled oats, they provide sustained energy and help keep you feeling full longer. Additionally, using natural sweeteners like honey or maple syrup means you can enjoy a treat without the refined sugars that often accompany traditional desserts.
Caloric and Nutritional Breakdown Per Serving
Each bliss bite contains approximately 80-100 calories, depending on the size and specific ingredients used. They are rich in healthy fats, fiber, and protein, making them a wholesome snack option. Here’s a quick nutritional breakdown per serving (assuming 12 bites total):
– Calories: 90
– Protein: 3g
– Fat: 5g
– Carbohydrates: 9g
– Fiber: 1g
– Sugar: 3g
Discussion on How These Bites Can Fit into Various Dietary Lifestyles
These bliss bites are versatile, fitting into various dietary lifestyles, including vegan and gluten-free. By using gluten-free oats and a plant-based sweetener, those with dietary restrictions can enjoy these treats without worry. They also make an excellent post-workout snack for those looking to replenish energy levels with nutritious ingredients.
Storage and Shelf Life
Best Practices for Storing Bliss Bites to Maintain Freshness
To keep your No-Bake Chocolatey Peanut Butter Bliss Bites fresh, store them in an airtight container in the refrigerator. Layer parchment paper between layers of bites to prevent sticking and maintain their shape.
Information on How Long They Can Last in the Refrigerator
When stored properly, these bliss bites can last up to one week in the refrigerator. If you want to keep them longer, consider freezing them. They can be stored in the freezer for up to three months. Just remember to let them thaw in the fridge before enjoying.
Conclusion
In summary, making No-Bake Chocolatey Peanut Butter Bliss Bites is not only easy but also offers a delicious and nutritious option for snacking or dessert. With the right balance of sweet and salty flavors, these bliss bites provide a satisfying treat that aligns with various dietary preferences. Enjoy them as a wholesome snack throughout the week or serve them at gatherings as a delightful dessert. The joy of creating such a delicious treat with minimal effort is truly rewarding, and you’ll find yourself reaching for these bliss bites time and time again. Whether you’re fueling up after a workout or satisfying a sweet craving, these bites are sure to impress. So, gather your ingredients, follow the steps, and indulge in the bliss!
