
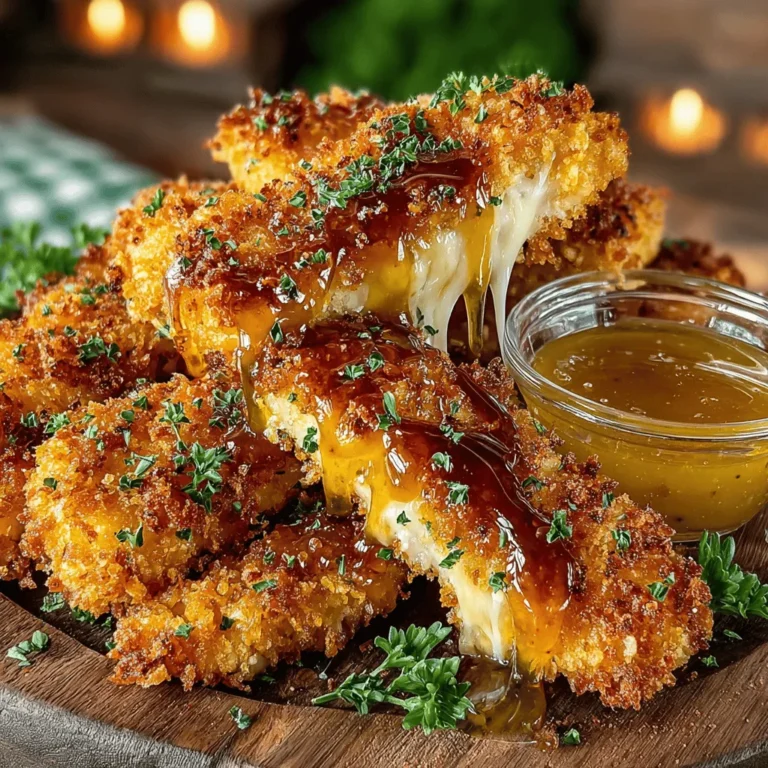
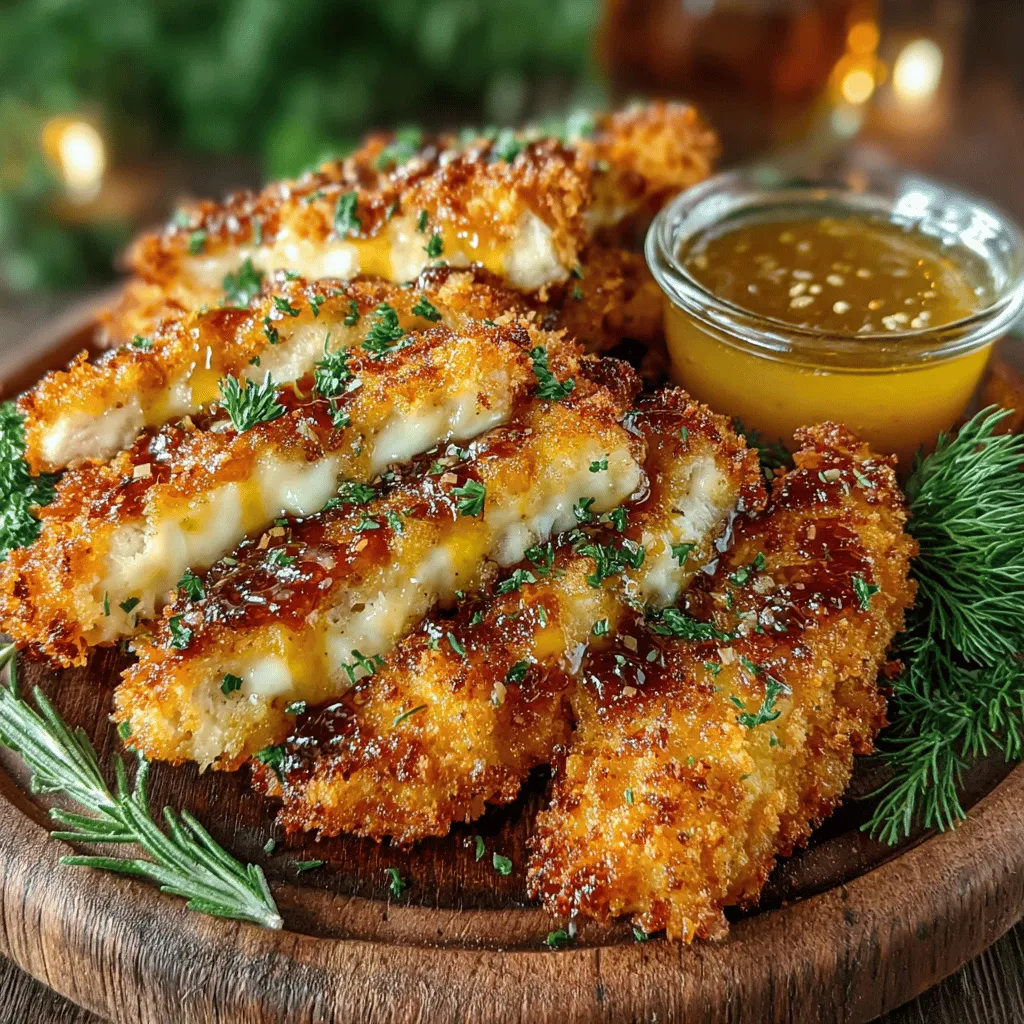
Crispy chicken tenders are a beloved dish that appeals to both kids and adults alike. Their crunchy exterior and juicy interior make them an irresistible choice for family meals, game days, or casual gatherings. Pairing these crispy delights with a tangy honey mustard dip elevates the dish, adding a sweet and savory contrast that enhances every bite. Whether you’re preparing a quick weeknight dinner or a special treat for guests, these chicken tenders are sure to impress.
Ingredients
– 1 pound boneless, skinless chicken breasts
– 1 cup buttermilk
– 1 teaspoon garlic powder
– 1 teaspoon onion powder
– 1 teaspoon smoked paprika
– 1 teaspoon salt
– 1/2 teaspoon black pepper
– 1 cup all-purpose flour
– 1 cup breadcrumbs (panko recommended for extra crunch)
– 2 large eggs
– Vegetable oil (for frying)
For the Honey Mustard Dip
– 1/2 cup Dijon mustard
– 1/4 cup honey
– 1 tablespoon apple cider vinegar
Instructions
1. Prepare the Chicken: Cut the chicken breasts into tenders, ensuring they are uniform in size for even cooking.
2. Marinate the Chicken: In a bowl, combine the buttermilk, garlic powder, onion powder, smoked paprika, salt, and pepper. Add the chicken tenders, ensuring they are fully submerged. Cover and refrigerate for at least 1 hour or up to 24 hours for maximum flavor and tenderness.
3. Set Up Breading Station: Prepare three shallow dishes. In the first dish, place the flour. In the second dish, whisk the eggs until well combined. In the third dish, add the breadcrumbs.
4. Bread the Chicken: Remove the chicken tenders from the marinade, allowing excess liquid to drip off. Dredge each tender in flour, shaking off the excess, then dip into the egg mixture, and finally coat with breadcrumbs. Press the breadcrumbs onto the chicken to ensure an even coating.
5. Heat the Oil: In a large skillet, heat about 1/2 inch of vegetable oil over medium-high heat until shimmering. To check if it’s ready, drop a few breadcrumbs into the oil; they should sizzle immediately.
6. Fry the Chicken Tenders: Carefully add the breaded chicken tenders to the hot oil in batches, without overcrowding the pan. Fry for about 3-4 minutes on each side, or until golden brown and cooked through. Use a meat thermometer to ensure the internal temperature reaches 165°F.
7. Drain and Serve: Once cooked, transfer the chicken tenders to a plate lined with paper towels to drain excess oil. Serve warm with the honey mustard dip.
Understanding the Ingredients
Breakdown of the Chicken Tenders’ Ingredients
The foundation of crispy chicken tenders lies in the quality of the ingredients used.
– Boneless, Skinless Chicken Breasts: This cut is ideal for tenders because it remains juicy and tender during cooking. It also allows for easy preparation and uniform cooking.
– Buttermilk: Often regarded as a secret ingredient, buttermilk tenderizes the chicken thanks to its acidity and helps the breading adhere better.
– Spices and Seasonings: The addition of garlic powder, onion powder, and smoked paprika enhances the flavor profile, adding depth and warmth to each bite.
Exploring the Honey Mustard Dip Ingredients
– Dijon Mustard: This ingredient is key to the dip’s flavor, providing a tangy kick that complements the sweetness of honey.
– Honey: Balancing the dip’s profile, honey adds sweetness and depth, making it a perfect pairing for the savory chicken tenders.
– Apple Cider Vinegar: A splash of apple cider vinegar brightens the dip, adding a refreshing acidity that balances the richness of the dish.
Marinating the Chicken Tenders
Marination is crucial for infusing flavor and ensuring the chicken remains tender throughout the cooking process.
– Importance of Marination: Allowing the chicken to soak in a seasoned buttermilk mixture not only enhances the taste but also ensures a moist final product.
– Step-by-Step Guide on How to Marinate Effectively: Combine the marinade ingredients in a bowl, add the chicken, and ensure each piece is well coated. Cover and refrigerate to allow the flavors to penetrate.
– Timing: While marinating for 1 hour will impart flavor, extending the marination to 24 hours will yield even more tender and flavorful chicken.
– Tips for Ensuring Even Coating: Shake off excess marinade to prevent soggy breading and ensure a crispier result.
Setting Up the Breading Station
An organized breading station is essential for achieving the perfect chicken tenders.
– Importance of an Organized Breading Station: Having a structured setup minimizes mess and streamlines the cooking process.
– Detailed Description of the Breading Process: Start with a flour coating to create a dry surface, followed by an egg wash that helps the breadcrumbs adhere. Finally, roll the chicken in breadcrumbs, pressing firmly to ensure they stick well. This three-step process is key to achieving a crispy exterior.
By following these detailed instructions and understanding the ingredients, you are well on your way to creating delicious crispy chicken tenders with a delightful honey mustard dip that your whole family will love.
Flour vs. Panko Breadcrumbs: Texture and Crunch Explained
When it comes to achieving that perfect crispy texture for chicken tenders, the choice between flour and panko breadcrumbs is crucial. Flour creates a light coating but may not provide the crunch you desire. On the other hand, panko breadcrumbs, which are larger and flakier than traditional breadcrumbs, result in an airy, crispy exterior that enhances the overall bite of the chicken. For the ultimate crunch, consider combining both: use flour for the initial coating to adhere the seasonings, followed by a generous layer of panko for that extra crispiness.
Seasoning Tips: How to Balance Flavors in the Breading
The seasoning of your breading can make or break your chicken tenders. A balance of flavors is essential. Start with a base of salt and pepper, then experiment with garlic powder, onion powder, paprika, and even a pinch of cayenne for heat. If you prefer a more herby flavor, consider adding dried thyme or oregano. Always taste your seasoning mix before coating the chicken to ensure it’s well-balanced; it should be flavorful enough to stand out against the chicken without overwhelming it.
Best Practices for Frying Chicken Tenders
Frying chicken tenders may seem straightforward, but there are best practices to ensure they turn out perfectly every time. First, make sure your oil is preheated to the right temperature—around 350°F to 375°F. This ensures a crispy exterior while keeping the inside juicy. Fry the tenders in batches to avoid overcrowding the pan, which can lower the oil temperature and lead to greasy chicken.
Choosing the Right Oil and Temperature
When selecting oil for frying, choose one with a high smoke point, such as canola, vegetable, or peanut oil. These oils not only withstand high temperatures but also add a neutral flavor that won’t overpower your chicken. Maintaining the right frying temperature is crucial; too low will result in soggy tenders, while too high can burn the breading before the chicken is cooked through.
Safety Tips for Frying
Always prioritize safety while frying. Use a deep-fry thermometer to monitor the oil temperature accurately. Keep a lid nearby to cover the pot in case of flare-ups, and never leave hot oil unattended. Have a fire extinguisher ready, and ensure your cooking area is clear of clutter.
Signs that the Chicken is Cooked Properly
To confirm that your chicken tenders are cooked properly, look for a golden-brown color on the outside. The internal temperature should reach at least 165°F for safe consumption. Use a meat thermometer for accuracy; this ensures your tenders are not only safe but also juicy and tender.
Importance of Monitoring Internal Temperature
Monitoring the internal temperature of the chicken is critical. This step not only guarantees food safety but also helps avoid overcooking, which can lead to dryness. Aim to remove the chicken from the oil when it reaches 160°F, as it will continue to cook slightly after being removed from the heat.
Visual Cues for Doneness (Golden Brown Color)
Visual cues are vital when frying chicken tenders. Look for a consistent golden-brown color across all sides. If there are darker spots, it may indicate uneven cooking. Additionally, the texture should feel crispy and firm to the touch, signaling that the breading is perfectly cooked.
Making the Honey Mustard Dip
Creating a delicious honey mustard dip is simple and can be customized to your taste preferences.
Step-by-Step Instructions for Creating the Dip
1. In a small bowl, combine equal parts of honey and Dijon mustard.
2. Adjust the ratio to taste; for a sweeter dip, add more honey, and for a tangier flavor, increase the mustard.
3. Mix in a splash of apple cider vinegar or lemon juice for added brightness.
4. Whisk until smooth and creamy, then let it sit for a few minutes to allow the flavors to meld.
Customizing the Dip: Adjusting Sweetness and Tang to Personal Preference
Feel free to experiment with the dip by adding a pinch of garlic powder for an extra kick or a dash of hot sauce for some heat. Adjusting the sweetness and tang will allow you to tailor the dip to your liking, making it a versatile accompaniment to not just chicken tenders but other fried foods as well.
Presentation Ideas for Serving the Dip Alongside the Tenders
To make your dip visually appealing, consider serving it in a small, vibrant bowl placed in the center of a platter of chicken tenders. Garnish the platter with fresh herbs like parsley or cilantro, and add lemon wedges for a pop of color. This not only enhances the presentation but also invites your guests to dig in.
Serving Suggestions
How to Effectively Arrange the Chicken Tenders and Dip for Serving
When serving, an attractive arrangement goes a long way. Place the chicken tenders in a circular pattern around the dip, allowing for easy access. Alternatively, consider skewering the tenders on wooden sticks for a fun, finger-food presentation.
Side Dish Pairings That Complement the Meal
Pair your crispy chicken tenders with sides that enhance the overall dining experience. Fresh salads, such as a classic Caesar or a mixed greens salad with vinaigrette, provide a refreshing contrast. Roasted vegetables add depth and color to the plate, while crispy French fries are always a crowd-pleaser.
Suggestions for Fresh Salads, Roasted Vegetables, or Fries
For a light and healthy touch, consider a side of coleslaw or a simple cucumber and tomato salad. Roasted sweet potatoes or seasonal vegetables like asparagus or zucchini can also elevate the meal while adding nutritional value.
Presentation Tips: Using Herbs and Lemon Wedges for Visual Appeal
To create an enticing presentation, use fresh herbs as a garnish. Sprigs of dill or parsley can brighten up the plate, while lemon wedges not only add color but also give guests the option to enhance the flavor of their chicken tenders with a squeeze of citrus.
Conclusion
Crispy chicken tenders paired with a delightful honey mustard dip create a dish that is both comforting and satisfying. With its layers of flavor and texture, this recipe is perfect for family gatherings, casual dinners, or even game-day celebrations.
Whether you choose to stick with classic seasonings or customize your dip, the joy of cooking and sharing homemade meals makes the effort worthwhile. Embrace the experience and savor each bite, knowing that your kitchen triumph will be a hit with everyone around the table.
