
When it comes to indulging in the world of pastries, few treats can rival the allure of a perfectly crafted Danish braid. The Elegant Pear & Almond Danish Braids stand out not only for their exquisite taste but also for the delightful combination of flaky pastry, luscious sweet pears, and rich almond flavors. This recipe offers the perfect balance of textures and flavors, making it a wonderful choice for breakfast, brunch, or dessert. Whether you are an experienced baker or a novice looking to impress, these braids are sure to captivate your palate and those of your guests.
The Cultural Significance of Danish Pastries
Danish pastries have a rich history rooted in European baking traditions, particularly in Denmark, where they originated in the 19th century. The pastry’s flaky layers are a direct result of the lamination technique, which involves folding butter into dough multiple times to create layers that rise beautifully when baked. This method not only results in an airy and delicate texture but also allows for endless creativity in fillings and toppings.
In Denmark, the term “wienerbrød” translates to “Viennese bread,” reflecting the influence of Austrian bakers who brought their techniques to Denmark. Over time, Danish pastries have become synonymous with a delightful culinary experience, celebrated in cafes and bakeries worldwide. These pastries often feature a variety of fillings, ranging from fruits to cream cheese and nuts, showcasing their versatility and universal appeal.
As we embark on the journey to create the Elegant Pear & Almond Danish Braids, you’ll discover how to bring this traditional pastry into your kitchen, allowing you to savor the delightful blend of flavors and textures that make Danish pastries so beloved.
Understanding the Ingredients
Before diving into the baking process, it’s essential to familiarize yourself with the key ingredients that will come together to create these delectable Danish braids.
All-Purpose Flour
The foundation of any great pastry is its dough, and for our Danish braids, all-purpose flour is the star ingredient. This versatile flour strikes the right balance between protein content and gluten development, ensuring that the dough achieves the perfect consistency. The goal is to create a dough that is both tender yet sturdy enough to hold its shape during baking.
Unsalted Butter
Butter plays a crucial role in creating the signature flakiness of Danish pastry. By using unsalted butter, you have better control over the flavor profile of your dough, allowing you to adjust the salt to your preference. The butter not only adds richness but also contributes to the layers of flakiness that are characteristic of a well-made Danish.
Filling Ingredients: Pears, Almond Paste, and Spices
The filling of our Elegant Pear & Almond Danish Braids combines the sweetness of ripe pears with the nutty richness of almond paste. Pears not only provide natural sweetness but also contribute moisture to the filling, enhancing the overall flavor profile. When selecting pears, look for varieties like Bartlett or Bosc, which are known for their juicy and tender flesh.
Almond paste is another key component that brings depth to the filling. Made from ground almonds and sugar, it complements the pears beautifully and introduces a distinct almond flavor that elevates the entire pastry. To round out the filling, a touch of cinnamon or nutmeg can be added, enhancing the aromatic qualities and creating a warm, inviting scent as the pastries bake.
The Perfect Pairing of Almond and Pear
Almonds and pears are a classic combination that works harmoniously together. The nutty, slightly sweet flavor of almonds pairs exquisitely with the juicy, floral notes of pears, making it a popular choice in both desserts and pastries. This combination not only pleases the palate but also creates a visually stunning filling that will entice anyone who lays eyes on the finished product.
Preparing the Dough
Now that you have a solid understanding of the ingredients, it’s time to begin the process of crafting the dough for your Elegant Pear & Almond Danish Braids. The preparation of the dough is a crucial step in achieving the desired texture and flavor.
Mixing and Kneading the Dough
Start by gathering your ingredients: all-purpose flour, sugar, salt, yeast, milk, and unsalted butter. Begin by combining the flour, sugar, and salt in a large mixing bowl. In a separate bowl, warm the milk slightly until it feels comfortable to the touch—this will help activate the yeast when added. Sprinkle the yeast into the warm milk and allow it to sit for about 5 minutes until it becomes frothy. This step is essential as it ensures that the yeast is alive and ready to work its magic in the dough.
Next, pour the yeast mixture into the dry ingredients and mix until a shaggy dough forms. At this stage, it’s important to not overwork the dough; simply mix until the ingredients are combined. Transfer the dough onto a lightly floured surface and knead it for about 5-7 minutes. The goal here is to develop the gluten, which will lend structure to the dough while maintaining a tender texture.
The Importance of Room Temperature Ingredients
Using room temperature ingredients is crucial when preparing your dough. Cold ingredients can hinder the yeast’s ability to rise effectively, resulting in a denser pastry. By allowing your ingredients, particularly the butter and milk, to come to room temperature, you facilitate better mixing and activation of the yeast, leading to a more successful rise.
The First Rise: Essential for Texture and Taste
Once your dough is kneaded to perfection, form it into a ball and place it in a greased bowl. Cover the bowl with a clean kitchen towel or plastic wrap and let it rise in a warm, draft-free area for about 1 to 1.5 hours, or until it has doubled in size. This first rise is essential, as it allows the yeast to ferment and produce carbon dioxide, which creates air pockets in the dough. These pockets are what give your Danish braids their light, airy quality.
Checking if the Dough Has Risen Adequately
To determine if your dough has risen adequately, gently press your finger into the surface. If the indentation remains and does not spring back, your dough is ready for the next step. If it springs back quickly, give it a bit more time to rise. Patience is key in the dough-making process; the more effort you put into this stage, the more rewarding your final product will be.
Crafting the Filling
With the dough rising beautifully, it’s time to prepare the pear and almond filling that will elevate your Danish braids to new heights.
Preparing the Pear and Almond Filling
Start by peeling and dicing your ripe pears into small, uniform pieces. This will ensure even distribution throughout the pastry and allow the pears to soften nicely during baking. In a mixing bowl, combine the diced pears with almond paste, a sprinkle of cinnamon, and a touch of sugar to enhance the sweetness. Gently fold the ingredients together, being careful not to mash the pears. The goal is to create a cohesive filling that showcases the individual flavors of the almonds and pears.
Selecting Ripe Pears
When selecting pears for your filling, it’s essential to choose ripe but firm fruits. Overripe pears can become mushy during baking, resulting in a filling that lacks texture. If you can, opt for pears that yield slightly to pressure but are not overly soft. This ensures that they will hold their shape while still providing a juicy burst of flavor.
As you prepare your filling, the enticing aroma of the almond paste and spices will begin to waft through your kitchen, hinting at the delicious pastries to come.
In this first part of our journey, you have laid the groundwork for crafting the Elegant Pear & Almond Danish Braids. With a solid understanding of the ingredients and a detailed approach to preparing the dough and filling, you are well on your way to creating a show-stopping pastry that will delight all who indulge in it. Stay tuned for the next steps, where we will assemble and bake these delightful treats to perfection.
{{image_2}}
Creating a delicious and visually stunning dessert like the Elegant Pear & Almond Danish Braids requires careful attention to detail, particularly when it comes to flavor, texture, and presentation. In this section, we will delve deeper into the intricacies of the filling, the rolling and assembling techniques, baking tips, and final presentation suggestions that will elevate your Danish braids to a new level of elegance.
Flavor and Texture Balance
The foundation of a tantalizing pear and almond Danish lies in the exquisite balance of flavors and textures. The almond paste, ground almonds, and spices work harmoniously to create a rich and satisfying filling. Almond paste provides a sweet, nutty flavor, while ground almonds contribute a delightful texture, adding a slight crunch that contrasts beautifully with the tender, flaky pastry.
Incorporating a hint of warmth from spices such as cinnamon or nutmeg enhances this balance, giving the filling depth and inviting complexity. The addition of lemon zest cannot be overlooked; it brightens the overall profile, cutting through the richness of the almond and pear, and providing a refreshing lift that makes each bite delightful.
Rolling and Assembling the Danish
Instructions for Rolling the Dough
When it comes to rolling out the dough for your Danish braids, precision is key. Begin by lightly flouring your work surface to prevent sticking. Roll the chilled pastry into a rectangle approximately 1/4 inch thick. Aim for dimensions of about 12 inches by 16 inches. This thickness is crucial as it allows for a sturdy structure that can hold the filling without tearing.
Visualizing the Braiding Technique
The braiding technique is not just functional; it is essential for creating an eye-catching presentation. To braid your Danish, first, cut diagonal slits along the edges of the rolled-out dough, each about 2 inches apart. The center section will be where you place the almond-pear filling.
As you braid, it’s important to alternate crossing the strips over each other, creating a beautiful woven design. This not only ensures that your filling is secure but also showcases the intricate work you’ve put into your Danish.
Tips for Filling and Securing the Braid
To ensure the filling is well-distributed, spoon it onto the center of the dough, leaving space at the edges for braiding. Avoid overfilling, as this can cause the filling to leak out during baking. Once the filling is in place, carefully fold the end pieces of the pastry over the filling, then braid the side strips over the top. This technique secures the filling and creates an appealing final shape.
Don’t forget to pinch the ends of the braid to seal it well; this will help maintain the integrity of your Danish during the second rise and baking.
The Second Rise: Importance for Texture
After assembling, allow your Danish to undergo a second rise. This crucial step enhances the texture of the pastry, giving it a light and airy quality. Cover your braid loosely with a clean kitchen towel and let it rise in a warm, draft-free area for about 30 minutes. This rise time allows the yeast to work its magic, contributing to a beautifully puffed and flaky pastry in the end.
Baking the Danish
Preheating the Oven
Preheating your oven is an essential step in ensuring even baking. Set your oven to 375°F (190°C) at least 20 minutes before you plan to bake the Danish. A properly heated oven allows the pastry to puff up nicely and develop that coveted golden-brown crust while also ensuring the filling is cooked through.
Best Practices for Egg Wash and Garnishing
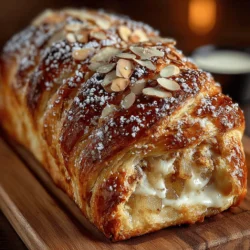
Before placing your Danish in the oven, apply an egg wash for that glossy finish that makes pastries so appealing. Whisk one egg with a tablespoon of water and gently brush it over the surface of the braid. This step not only enhances the color but also helps to bind any toppings you may want to add, such as sliced almonds.
For an added touch of texture and flavor, sprinkle some sliced almonds over the top of the egg wash. This gives a beautiful crunch and complements the almond filling perfectly.
Timing and Temperature
Keep a close eye on your Danish as it bakes. At the 25-minute mark, check its progress; you’re aiming for a golden-brown finish. If the top is browning too quickly, you can cover it loosely with aluminum foil to prevent burning while allowing the inside to bake thoroughly. The total baking time is typically around 30-35 minutes, but this can vary based on your oven, so always rely on visual cues as your guide.
Final Presentation
Cooling and Dusting for Elegance
Once your Danish is out of the oven, allow it to cool on a wire rack for at least 10 minutes. This cooling period is important as it helps the filling to set slightly, making it easier to slice and serve. After cooling, a light dusting of powdered sugar adds an elegant finish to your Danish. Use a fine mesh sieve to sprinkle the sugar evenly over the top, creating a beautiful contrast against the golden pastry.
Serving Suggestions
The Elegant Pear & Almond Danish Braids can be served warm or at room temperature, making them versatile for any occasion. Consider pairing them with a steaming cup of coffee or a refreshing cup of tea for a delightful breakfast or afternoon treat. For a more decadent experience, serve them alongside a scoop of vanilla ice cream or a dollop of whipped cream.
Garnishing options can elevate your presentation even more. Fresh mint leaves or thin slices of pear can add color and a touch of freshness to your serving platter, making it visually appealing and inviting to your guests.
Enhancing Visual Appeal
When serving your Danish, consider the arrangement on the plate. A simple, elegant placement can make a significant difference. Arrange your Danish braids on a rustic wooden board or a delicate porcelain platter. A few fresh fruits around the pastry can enhance not only the look but also the flavor experience.
Conclusion
In summary, creating the Elegant Pear & Almond Danish Braids is a rewarding process that combines culinary skill with creativity. From the careful preparation of the filling that balances flavors and textures, to the artful braiding and precise baking, each step contributes to a final product that is both beautiful and delicious.
Baking from scratch not only fills your kitchen with delightful aromas but also provides a sense of accomplishment that is truly satisfying. Whether you’re preparing this treat for a special occasion or simply to enjoy with loved ones, these Danish braids are sure to impress.
We encourage you to try this recipe, embrace the process, and savor the delightful results of your efforts. Your Elegant Pear & Almond Danish Braids await, ready to be shared and enjoyed.