
Introduction to Cherry Zest Delight Bars
Cherry Zest Delight Bars are a delightful fusion of flavor that celebrates the vibrant taste of tart cherries intertwined with a refreshing burst of zesty lemon. This recipe is not just a treat for the taste buds; it’s a celebration of seasonal ingredients that elevate the overall enjoyment of dessert. The sweet-tart balance of cherries paired with the bright acidity of lemon creates a harmonious blend that is both refreshing and indulgent. These bars are perfect for summer picnics, potlucks, or simply as a delightful afternoon snack.
Emphasizing the importance of seasonal ingredients, the use of fresh cherries not only enhances the flavor profile but also ensures that you are enjoying the fruits at their peak ripeness. Seasonal fruits tend to be more flavorful and nutritious, making them a key component in any dessert recipe. As you explore the layers of flavor in Cherry Zest Delight Bars, you will discover how each ingredient contributes to a delicious experience that is sure to impress family and friends alike.
The Allure of Cherry Desserts
Cherry desserts hold a special place in various culinary traditions around the world. From American cherry pie to French clafoutis, cherries have long been celebrated for their rich flavor and versatility. These succulent fruits are not only delicious but also packed with health benefits. Cherries are rich in antioxidants, vitamins, and minerals, making them a nutritious choice for adding a burst of flavor to your baked goods.
In addition to their health benefits, cherries are often associated with the warmth of summer. The peak season for cherries typically runs from late spring to early summer, making this an ideal time to incorporate them into your cooking and baking. Whether you choose to use fresh cherries straight from the farmer’s market or opt for frozen varieties, the sweet-tart nature of this fruit shines through in desserts, making them a favorite among many.
Understanding the Recipe Components
To create Cherry Zest Delight Bars, it’s essential to understand the three primary components that make up this delicious recipe: the crust, the filling, and the topping. Each layer plays a critical role in building flavor and texture, resulting in a well-rounded dessert that tantalizes the palate.
1. The Crust: The base of the Cherry Zest Delight Bars provides a sturdy foundation for the filling. Typically made with buttery flour and sugar, the crust should be tender yet firm enough to hold the other layers without falling apart.
2. The Filling: The star of the show, the cherry filling, is where the vibrant flavors come to life. Made with fresh or frozen cherries, sugar, and a hint of lemon zest and juice, this layer is sweet, tangy, and bursting with fruitiness.
3. The Topping: A delightful crumble or streusel topping adds texture and an extra layer of sweetness to the bars. This can be made from a mixture of flour, oats, butter, and sugar, creating a crunchy contrast to the smooth filling.
When selecting cherries for your recipe, freshness is key. Look for cherries that are plump and firm, with a rich red color. If using frozen cherries, ensure they are unsweetened and of high quality to maintain the integrity of the flavors.
Creating the Perfect Crust
The crust is an essential element of Cherry Zest Delight Bars, serving as the base that supports the luscious filling. To create the perfect crust, follow these detailed instructions:
1. Gather Your Ingredients: You will need all-purpose flour, granulated sugar, unsalted butter, and a pinch of salt. For the best results, make sure your butter is cold. Chilling the butter helps to create a flakier texture in the crust.
2. Mix the Dry Ingredients: In a mixing bowl, combine the flour, sugar, and salt. Whisk these together until evenly combined, ensuring there are no lumps.
3. Cut in the Butter: Use a pastry cutter or your fingers to incorporate the cold butter into the dry mixture. You should aim for a crumbly texture, similar to coarse sand. Be careful not to overmix; the goal is to have small pieces of butter distributed throughout the flour mixture.
4. Form the Dough: Once the butter is cut into the mixture, add a small amount of cold water, one tablespoon at a time, until the dough comes together. It should be moist but not sticky.
5. Chill the Dough: After forming the dough, wrap it in plastic wrap and place it in the refrigerator for at least 30 minutes. Chilling the dough allows the gluten to relax, resulting in a tender crust.
6. Pre-bake the Crust: When you are ready to assemble the bars, preheat your oven and roll out the chilled dough to fit your baking dish. Press the dough evenly into the bottom of the dish and poke a few holes with a fork to prevent bubbling. Bake until lightly golden, ensuring a firm base for the filling.
The crust serves as the foundation for the Cherry Zest Delight Bars, providing a perfect balance to the sweet and tangy filling. By following these steps, you can ensure a deliciously flaky and flavorful crust that complements the rest of the dessert beautifully.
Crafting the Cherry Filling
Once the crust is ready, it’s time to focus on crafting the cherry filling that will take your Cherry Zest Delight Bars to the next level. Here’s a step-by-step guide to preparing this flavorful layer:
1. Prepare the Cherries: If using fresh cherries, wash them thoroughly, remove the pits, and slice them in half. For frozen cherries, allow them to thaw and drain any excess liquid to prevent the filling from becoming too watery.
2. Combine Ingredients: In a medium saucepan, combine the prepared cherries with granulated sugar, cornstarch, lemon juice, and lemon zest. The sugar will help to draw out the natural juices of the cherries, while the cornstarch acts as a thickening agent to create a luscious filling.
3. Cook the Mixture: Over medium heat, cook the cherry mixture, stirring gently. As the cherries begin to release their juices, continue to cook until the mixture thickens and bubbles. This process should take about 5-7 minutes. The heat will help meld the flavors together, resulting in a deliciously thick filling.
4. Cool the Filling: Once thickened, remove the saucepan from the heat and allow the filling to cool slightly before pouring it over the pre-baked crust. This cooling step is essential to prevent the crust from becoming soggy.
5. Layer it Up: Pour the cooled cherry filling over the crust, spreading it evenly. This ensures that every bite will be packed with flavor.
By expertly combining the sweet and tart flavors of cherries with the bright acidity of lemon, you create a filling that perfectly complements the buttery crust. The balance of flavors is what makes Cherry Zest Delight Bars truly unique and irresistible.
Now that you have an understanding of the ingredients and initial steps involved in making Cherry Zest Delight Bars, you’re well on your way to creating this delightful dessert that will surely impress anyone lucky enough to taste it. Stay tuned for the next part, where we will explore the final touches and the topping that brings everything together.
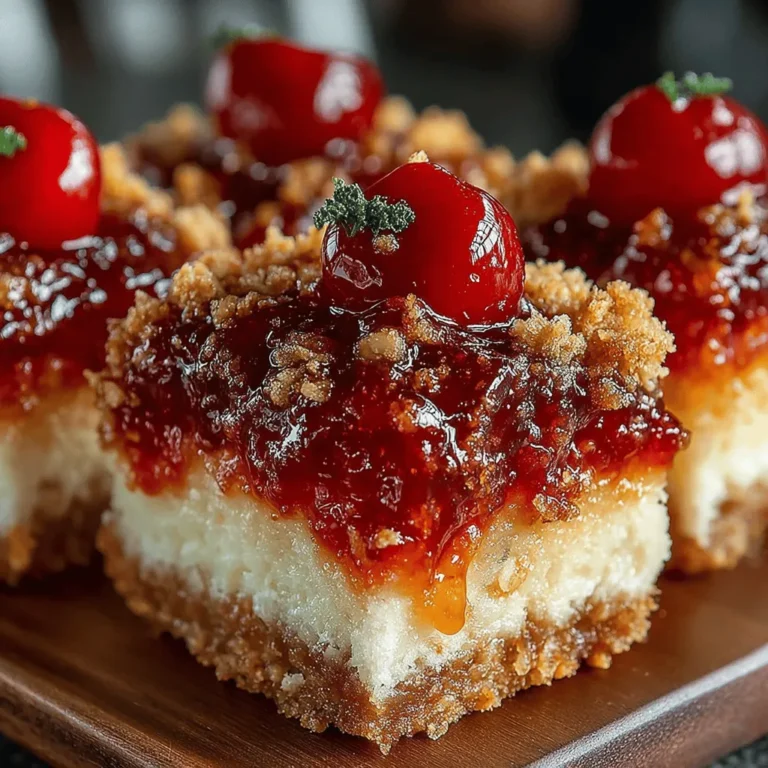
{{image_2}}
Discussion of Cornstarch as a Thickening Agent
In crafting the perfect cherry filling for your Cherry Zest Delight Bars, cornstarch plays a pivotal role as a thickening agent. It helps bind the fruit juices, creating a luscious and satisfying texture that holds the filling together. When mixed with the tartness of cherries, cornstarch ensures that your filling is not overly runny, leading to a delightful balance in every bite.
For those with dietary restrictions, there are several alternatives to cornstarch that still yield excellent results. Arrowroot powder is a popular substitute that provides a similar thickening effect and is gluten-free. Tapioca starch is another viable option, adding a glossy finish to your filling. Both alternatives work well for those following a paleo or vegan diet, making your Cherry Zest Delight Bars accessible to a broader audience.
Making the Oat Topping
Creating the oat topping for your Cherry Zest Delight Bars is a straightforward process that enhances both flavor and texture. To begin, combine rolled oats, flour, brown sugar, and a pinch of salt in a mixing bowl. This combination not only adds a delightful crunch but also creates a beautiful contrast to the soft cherry filling.
Instructions for the Oat Topping
1. Mix Dry Ingredients: In a bowl, combine 1 cup of rolled oats, 1/2 cup of all-purpose flour, and 1/3 cup of brown sugar. Add a pinch of salt for flavor.
2. Incorporate Butter: Melt 1/2 cup of unsalted butter and pour it into the dry mixture. Stir until the mixture resembles coarse crumbs.
3. Forming the Topping: Press the mixture lightly into a flat layer, ensuring even distribution, which will create a cohesive topping during baking.
Variations for Different Flavors
While the classic oat topping is delightful, consider experimenting with variations to suit your palate. Adding chopped nuts, such as pecans or walnuts, can introduce a rich nuttiness and added crunch. Alternatively, spices like cinnamon or nutmeg can provide a warm depth of flavor, harmonizing beautifully with the cherries.
The topping’s texture not only provides a satisfying crunch but also complements the tartness of the cherries, balancing the overall sweetness of the dessert. This interplay of flavors makes each bite a delightful experience.
Assembling the Cherry Zest Delight Bars
Once your cherry filling and oat topping are prepared, it’s time to assemble your Cherry Zest Delight Bars. This step is crucial for achieving a well-layered dessert that is as beautiful as it is delicious.
Tips for Layering
1. Even Layering: Start by pouring the slightly cooled cherry filling over the baked crust, spreading it evenly with a spatula. This ensures that every bar will have a generous amount of filling.
2. Topping Application: After layering the filling, sprinkle the oat topping evenly over the cherries. Use your hands to break up any large clumps to ensure consistent coverage.
3. Cooling Before Assembly: It’s important to allow the cherry filling to cool slightly before assembly. This prevents the crust from becoming soggy, ensuring the bars hold their shape when sliced.
Baking to Perfection
Baking your Cherry Zest Delight Bars requires attention to time and visual cues to achieve the ideal texture and flavor.
Guidelines for Baking
1. Baking Time: Preheat your oven to 350°F (175°C) and bake the assembled bars for about 30-35 minutes or until the topping is golden brown and the filling is bubbly.
2. Visual Cues: Look for a lightly golden topping and bubbling edges as indicators that your bars are ready. The filling should be slightly set but still soft.
Cooling Before Slicing
After removing the bars from the oven, allow them to cool completely in the pan. This cooling period is essential for the bars to set properly and makes slicing much easier. If you attempt to slice them while still warm, they may crumble and lose their shape.
Serving Temperatures and Presentation Ideas
For the best flavor experience, serve your Cherry Zest Delight Bars at room temperature. Consider dusting them with powdered sugar before serving for an elegant touch. If desired, add a dollop of whipped cream or a scoop of vanilla ice cream on the side for an indulgent treat.
Storage and Serving Suggestions
To keep your Cherry Zest Delight Bars fresh and delicious, proper storage is key.
Best Practices for Storage
1. Cool Completely: Ensure the bars have cooled completely before transferring them to an airtight container. This helps prevent moisture buildup that could lead to sogginess.
2. Refrigeration: Store the bars in the refrigerator for up to a week. For longer storage, they can be frozen for up to 3 months. Just be sure to wrap them tightly in plastic wrap and foil to prevent freezer burn.
Serving Suggestions
Cherry Zest Delight Bars are incredibly versatile and perfect for various occasions. They make an excellent addition to picnics, potlucks, and family gatherings. Pair them with fresh whipped cream or yogurt for a fresh contrast that enhances their flavors. For a seasonal twist, consider serving them with a scoop of cherry or lemon sorbet during the warmer months.
Conclusion: Enjoying Your Cherry Zest Delight Bars
In summary, Cherry Zest Delight Bars are a delightful dessert that beautifully marries the tartness of cherries with a sweet, crunchy oat topping. This recipe not only highlights the joy of baking with seasonal fruits but also offers a satisfying homemade treat that can be enjoyed by all.
Baking these bars is more than just a culinary task; it’s an opportunity to share the experience with friends and family. Encourage those around you to join in the fun, creating lasting memories while enjoying the delicious results of your efforts. Whether you’re indulging in a slice yourself or sharing them at a gathering, these Cherry Zest Delight Bars are sure to bring smiles and satisfaction.
Embrace the joy of baking, celebrate the vibrant flavors of cherries, and savor the satisfaction of homemade desserts that resonate with your loved ones. Happy baking!
