
Frozen Yogurt S’mores Cookie Bars Recipe
Introduction
When it comes to satisfying your sweet tooth on a warm summer day, few desserts can compete with the nostalgic appeal of S’mores. This beloved treat, traditionally made with toasted marshmallows, chocolate, and graham crackers, evokes memories of cozy campfires and summertime fun. However, there’s a delightful twist that elevates this classic treat into a refreshing dessert: Frozen Yogurt S’mores Cookie Bars. Combining the creamy goodness of frozen yogurt with the crunchy, chewy texture of cookie bars, this dessert captures all the flavors of S’mores while offering a lighter, cooler option perfect for gatherings or family nights at home.
The concept of merging frozen yogurt with S’mores flavors not only adds a refreshing element but also makes it a versatile dessert that can cater to various preferences. Whether you are hosting a summer barbecue, planning a picnic, or simply looking for a fun treat to enjoy with the family, these cookie bars are sure to impress. With their layered structure, they provide a delightful combination of textures and flavors that keeps everyone coming back for more.
Understanding the Ingredients
To create the perfect Frozen Yogurt S’mores Cookie Bars, understanding the choice of ingredients is crucial. Each component plays a significant role in achieving the desired texture and flavor. The base of this recipe is a delicious cookie layer that provides a sturdy foundation for the frozen yogurt and additional toppings.
The Cookie Base
The cookie base is made primarily from unsalted butter and a blend of sugars. The use of unsalted butter allows for better control of the overall saltiness of the dessert, ensuring that the sweet flavors of the cookie and the yogurt shine through. The combination of granulated sugar and brown sugar is essential for creating a chewy texture. Granulated sugar helps the cookie spread during baking, while brown sugar, which contains molasses, contributes moisture and a slight caramel flavor.
In addition to the sugars and butter, the recipe calls for an egg and vanilla extract. The egg serves as a binder, helping to hold the cookie together while adding richness. The vanilla extract not only enhances the flavor profile but also complements the sweetness of the sugars, creating a well-rounded taste experience.
The Frozen Yogurt Layer
The star of this dessert is undoubtedly the frozen yogurt layer. For this, vanilla yogurt is the go-to choice, providing a creamy and luscious backdrop for the S’mores flavors. You can opt for either Greek or regular yogurt, depending on your preference. Greek yogurt offers a thicker consistency and a tangy flavor, while regular yogurt is lighter and creamier. Both options work well, so choose based on your desired texture and taste.
To maintain the authenticity of S’mores, mini marshmallows and graham cracker crumbs are essential components of the frozen yogurt layer. Mini marshmallows not only add sweetness but also contribute to the nostalgic experience of S’mores. The graham cracker crumbs serve as a crunchy element that mimics the traditional graham cracker used in the original recipe, enhancing the dessert’s texture and flavor.
The Drizzle
No S’mores dessert would be complete without a rich chocolate drizzle. Melting chocolate and drizzling it over the top of the cookie bars not only adds a finishing touch but also elevates the presentation. It creates a beautiful contrast against the creamy yogurt layer and adds an extra layer of indulgence. The chocolate drizzle is not just for looks; it enhances the overall flavor, tying together the various elements of the dessert in a harmonious way.
Step-by-Step Preparation Guide
Now that you understand the components that make up these delicious Frozen Yogurt S’mores Cookie Bars, it’s time to dive into the preparation process. Follow these steps to create a dessert that will leave your taste buds dancing with delight.
Preheating the Oven and Preparing the Baking Pan
The first step in making your S’mores cookie bars is to preheat your oven to 350°F (175°C). Preheating ensures that your cookie base bakes evenly, achieving the perfect texture. While the oven is warming up, prepare your baking pan. A 9×9-inch square pan is ideal for this recipe, allowing for thick, satisfying bars. Line the pan with parchment paper, leaving some overhang on the sides, which will make it easier to lift the bars out after baking. This step is crucial for easy removal and prevents sticking, ensuring your cookie bars maintain their shape.
Making the Cookie Dough
Next, it’s time to make the cookie dough. In a large mixing bowl, begin by creaming together the unsalted butter, granulated sugar, and brown sugar. The creaming method is vital for optimal texture; it incorporates air into the dough, resulting in a light and chewy cookie. Use an electric mixer on medium speed to beat the butter and sugars until the mixture is light and fluffy, which typically takes about 2-3 minutes.
Once the butter and sugars are well combined, add the egg and vanilla extract to the bowl. Continue mixing until these ingredients are fully incorporated. In a separate bowl, whisk together the dry ingredients, which typically include all-purpose flour, baking soda, and a pinch of salt. Gradually add the dry mixture to the wet ingredients, mixing just until combined. Be careful not to over-mix, as this can lead to dense cookies.
Baking the Cookie Base
With your cookie dough ready, it’s time to transfer it to the prepared baking pan. Spread the dough evenly across the bottom of the pan, pressing it down gently to create a uniform layer. The cookie base should be about half an inch thick to ensure that it holds up well once the frozen yogurt layer is added.
Place the pan in the preheated oven and bake for approximately 12-15 minutes. Keep an eye on the cookies as they bake, looking for a light golden color around the edges. The center should be set but still slightly soft, as they will continue to firm up as they cool. A toothpick inserted into the center should come out with a few moist crumbs, indicating that they are done but not overbaked.
Once the cookie base is done, remove it from the oven and allow it to cool in the pan for about 10 minutes before transferring it to a wire rack to cool completely. This cooling step is important, as it ensures that the frozen yogurt layer can be added without melting.
Stay tuned for the next part of the recipe, where we’ll delve into creating the frozen yogurt layer and assembling your Frozen Yogurt S’mores Cookie Bars for a delightful summer treat!
{{image_2}}
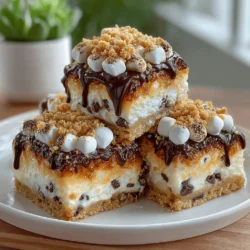
Creating the perfect Frozen Yogurt S’mores Cookie Bars requires careful attention to detail during the layering process, and the cooling stage is critical. This section will guide you through each step to ensure your dessert is not only delicious but visually appealing. Let’s dive into the methods of creating a harmonious balance of flavors and textures in your bars.
Cooling Process and Its Significance in Layering
Before adding the frozen yogurt layer, it’s essential to allow the cookie base to cool completely. This cooling period is crucial as it prevents the yogurt from melting when poured over the warm cookie crust. A warm base can compromise the integrity of your layers, causing them to blend instead of remain distinct. Ideally, let your cookie crust cool for at least 30 minutes at room temperature or place it in the refrigerator for 15 minutes to expedite the process.
Creating the Frozen Yogurt Layer
Now that your cookie base has cooled, it’s time to prepare the frozen yogurt layer. This layer is where the s’mores experience really shines, combining the creamy richness of yogurt with the sweet, fluffy texture of marshmallows.
Mixing Yogurt and Marshmallows for the Perfect Consistency
For the frozen yogurt layer, you will need about 2 cups of Greek yogurt, which provides a creamy texture and a tangy flavor. Combine the yogurt with 1 cup of mini marshmallows in a mixing bowl. For added sweetness, consider mixing in a tablespoon of honey or maple syrup, depending on your preference.
Using a spatula, gently fold the marshmallows into the yogurt until they are evenly distributed. Be careful not to overmix; you want to maintain the marshmallow’s fluffy texture that will contribute to the overall creaminess of the yogurt layer.
Tips for Spreading Yogurt Evenly
To achieve a smooth and even layer of frozen yogurt, dollop the yogurt mixture onto the cooled cookie crust in several spots. This method allows for easier spreading as you use an offset spatula or the back of a spoon to gently spread it outwards, filling in the gaps. Start from the center and work your way to the edges.
Make sure to apply gentle pressure; if you press too hard, you risk disturbing the cookie base. Aim for an even thickness of about 1 inch across the surface. Once the yogurt layer is evenly spread, use a spatula to smooth out the top, creating a flat surface that will be perfect for the next layer.
Layering the Cookie Crumbles
Once the yogurt layer is evenly spread, it’s time to add the cookie crumbles. This layer will provide a delightful crunch that contrasts beautifully with the creamy yogurt.
Techniques for Crumbling the Dough and Distribution Over Yogurt
To create the cookie crumbles, take the remaining cookie dough from your initial preparation (if you have any left) or prepare an additional batch if necessary. Use your hands or a food processor to crumble the dough into small pieces.
For even distribution, sprinkle the crumbles over the yogurt layer in small handfuls. This method ensures that the crumbles adhere to the yogurt without overwhelming the creamy layer. For a balanced texture, aim for an even distribution, covering the entire yogurt surface while allowing some of the yogurt to peek through.
Finishing Touches: Sprinkling and Freezing
With the cookie crumbles in place, it’s time to add the finishing touches for flavor and texture.
Importance of the Toppings for Texture and Flavor
Consider adding a sprinkle of graham cracker crumbs or mini chocolate chips on top of the cookie crumbles. These toppings not only enhance the visual appeal of your bars but also contribute to the classic s’mores flavor profile. The graham cracker crumbs add a toasty, sweet crunch, while the chocolate chips provide bursts of chocolate in every bite.
Detailed Instructions on Freezing Time and Conditions
Once your layers are complete, cover the dish with plastic wrap or aluminum foil. Place it in the freezer for at least 4 hours or until fully set. For best results, allow the bars to freeze overnight. The longer they freeze, the easier they will be to cut into squares without losing their shape.
When ready to serve, take the bars out of the freezer and let them sit at room temperature for about 10 minutes before cutting. This will soften the edges slightly, making slicing easier and enhancing the overall texture.
The Chocolate Drizzle: A Perfect Finish
To elevate your Frozen Yogurt S’mores Cookie Bars, a chocolate drizzle is the final touch that brings everything together.
Guide to Melting Chocolate Properly
For the drizzle, use about 1 cup of semi-sweet chocolate chips or a chocolate bar broken into pieces. Melting chocolate can be done using a microwave or a double boiler. If using a microwave, place the chocolate in a microwave-safe bowl and heat in 30-second intervals, stirring in between until smooth.
Techniques to Avoid Seizing or Burning Chocolate
Be cautious when melting chocolate. If it overheats, it can seize and become unusable. To avoid this, ensure that no moisture or water comes into contact with the chocolate, as this can cause it to seize. If chocolate does start to seize, a small amount of vegetable oil or coconut oil can sometimes salvage it by adding fat back into the mixture.
Presentation Tips for Serving the Bars
Once your chocolate is melted and smooth, use a fork or a piping bag to drizzle the chocolate over the frozen bars. Aim for a zigzag pattern that will add visual interest to your dessert. For an elegant finish, sprinkle a few extra mini marshmallows or graham cracker crumbs on top just before the chocolate sets.
Nutritional Insights
These Frozen Yogurt S’mores Cookie Bars not only satisfy your sweet tooth but also provide some nutritional benefits, particularly from the yogurt.
Overview of the Nutritional Benefits of Using Yogurt
Greek yogurt is high in protein, probiotics, and calcium, making it a healthier alternative to traditional ice cream. The probiotics support gut health, and the protein can help keep you feeling full longer. Additionally, using yogurt as a base reduces the overall fat content of the dessert.
Discussion on Portion Sizes and Indulgence
While these bars are a delicious treat, it’s essential to keep portion sizes in mind. Cutting the bars into smaller squares allows you to indulge without overdoing it, making them a perfect option for gatherings where you want to offer a variety of desserts.
Potential for Ingredient Substitutions for Dietary Needs
For those with dietary restrictions, consider making a few substitutions. You can use gluten-free graham crackers and a gluten-free cookie base to make this dessert suitable for those with gluten sensitivities. Additionally, for a lower sugar option, substitute regular yogurt with a sugar-free variety or use a natural sweetener like stevia in place of sugar in the crust.
Conclusion
The Frozen Yogurt S’mores Cookie Bars present a delightful blend of creamy, crunchy, and sweet flavors that are sure to impress family and friends alike. With layers of cookie crust, fluffy yogurt, and crunchy toppings, these bars provide a refreshing take on a classic s’mores treat.
Encourage your loved ones to try this recipe at home for a unique dessert experience that’s both indulgent and somewhat healthier. Not only will you enjoy making these bars, but you’ll also experience the joy that comes from sharing homemade treats with others. Enjoy the delightful flavors and the smiles they bring!