
Creamy Cherry Cheesecake Bars: A Dessert Delight
Cheesecake bars have gained immense popularity in the dessert world, and for good reason. These delightful treats combine the rich, creamy texture of traditional cheesecake with the convenience and portability of bars, making them an ideal choice for gatherings, picnics, or even a simple family meal. Among the myriad variations of cheesecake bars, creamy cherry cheesecake bars stand out as a particularly enchanting option. With their luscious filling, buttery crust, and vibrant cherry topping, these bars capture the essence of summer in every bite.
The appeal of creamy cherry cheesecake bars lies not only in their visually striking presentation but also in the harmonious blend of flavors and textures. The sweet-tart cherries contrast beautifully with the rich creaminess of the cheesecake filling, creating a dessert that is both indulgent and refreshing. Whether served at a festive gathering or enjoyed as an everyday treat, these bars are sure to impress and delight everyone at the table.
One of the standout features of creamy cherry cheesecake bars is their ease of preparation. Unlike traditional cheesecakes that require precise baking and cooling times, these bars can be whipped up relatively quickly and easily. This simplicity allows home bakers to create a delicious dessert without the stress often associated with more complex recipes. The joy they bring to gatherings and family meals is palpable, as they invite people to indulge in a slice of something truly special.
Understanding the Components of Creamy Cherry Cheesecake Bars
To appreciate the allure of creamy cherry cheesecake bars fully, it’s essential to understand the components that make up this delectable dessert. At its core, cheesecake is celebrated for its smooth, velvety texture and rich flavor. The key to achieving the perfect cheesecake lies in the quality of the ingredients used. Using high-quality cream cheese, fresh cherries, and premium vanilla can elevate the flavors and textures, ensuring that each bite is a memorable experience.
The construction of creamy cherry cheesecake bars typically revolves around three main components: the crust, the filling, and the topping. Each of these elements plays a crucial role in the overall taste and presentation of the dessert.
Creating the Perfect Crust
The crust serves as the foundation for creamy cherry cheesecake bars, providing structure and a delightful contrast to the smooth filling. A well-prepared crust can elevate the entire dessert, making it essential to get this step right.
The primary ingredients for the crust include:
– Graham cracker crumbs: These provide not only flavor but also a pleasant crunch that complements the creamy filling. The slight sweetness of the crumbs balances the tartness of the cherries, making them a perfect choice for this dessert.
– Unsalted butter: Acting as a binding agent, melted unsalted butter adds richness to the crust. It helps to hold the crumbs together while imparting a buttery flavor that enhances the overall taste.
– Granulated sugar: A touch of sweetness is necessary to balance the flavors. The granulated sugar helps to create a crust that is not only flavorful but also provides a slight caramelization when baked.
– Vanilla extract: This ingredient enhances the flavor profile of the crust, adding depth and a hint of warmth that complements the other components.
Step-by-Step Instructions for Preparing the Crust
1. Prepare the Oven: Preheat your oven to 350°F (175°C). This temperature is ideal for baking the crust to a golden brown.
2. Combine the Ingredients: In a medium mixing bowl, combine the graham cracker crumbs, granulated sugar, and melted unsalted butter. Use a fork or a spatula to mix these ingredients until they are well combined and resemble wet sand.
3. Press the Mixture into the Pan: Grease a 9×9-inch baking pan with cooking spray or line it with parchment paper for easy removal. Pour the crust mixture into the prepared pan, and using the back of a measuring cup or your fingers, firmly press it into an even layer across the bottom. Ensure that it is packed tightly to create a solid base.
4. Bake the Crust: Place the pan in the preheated oven and bake for 8-10 minutes. You want the crust to be lightly golden and set. Keep an eye on it to avoid over-baking, as a burnt crust can detract from the overall flavor of the bars.
5. Cool the Crust: Once baked, remove the crust from the oven and allow it to cool while you prepare the cheesecake filling. This step is crucial, as a warm crust can affect the texture of the filling.
Crafting the Creamy Cheesecake Filling
The filling is arguably the star of creamy cherry cheesecake bars. It is the component that provides the signature creaminess and rich flavor that cheesecakes are known for. A well-crafted filling can elevate your dessert from ordinary to extraordinary.
The key ingredients for the filling include:
– Cream cheese: This is the main component that gives the filling its characteristic creaminess. For the best results, use full-fat cream cheese, which not only provides the right texture but also contributes to the rich flavor.
– Granulated sugar: Just like in the crust, sugar plays a vital role in balancing the flavors of the filling. It adds sweetness and helps to create a smooth texture when combined with the cream cheese.
– Eggs: Eggs are essential for providing structure and richness to the filling. They help bind the ingredients together and contribute to the creamy texture that is so desirable in cheesecake.
As you embark on the journey of crafting the perfect creamy cheesecake filling, be prepared to create a treat that will have everyone coming back for seconds. In the next section of our article, we will delve deeper into the process of making the filling, ensuring that your creamy cherry cheesecake bars are a resounding success.
{{image_2}}
The Perfect Cheesecake Filling
To achieve the ultimate creamy texture and flavor in your cheesecake bars, every ingredient plays a crucial role. Here’s how to ensure your filling turns out perfectly:
Enhancing Flavor with Vanilla Extract
Vanilla extract is a staple in cheesecake recipes, enhancing the overall flavor profile. When incorporating it into your filling, opt for pure vanilla extract over imitation for a richer taste. The aromatic qualities of vanilla will beautifully complement the tartness of the cherries, creating a well-rounded dessert.
The Role of Sour Cream
Sour cream is another key ingredient that adds both tang and creaminess to your cheesecake filling. It not only balances the sweetness but also contributes to a velvety texture that melts in your mouth. For the best results, use full-fat sour cream, as it provides a creamier consistency and enhances the flavor.
Optional Flour for Texture Variations
While flour is not a traditional ingredient in cheesecake recipes, it can be included to alter the texture. If you prefer a denser cheesecake, feel free to add a tablespoon or two of all-purpose flour to your filling. This will help stabilize the mixture, especially if you plan to serve the bars at room temperature. However, if you prefer a lighter, creamier cheesecake, you can skip the flour altogether.
Step-by-Step Guide to Preparing the Cheesecake Filling
Now that we’ve discussed the ingredients, let’s dive into the preparation of the cheesecake filling. Follow these steps for a smooth and creamy filling:
1. Prepare Your Ingredients: Ensure that all your ingredients are at room temperature, especially the cream cheese. This is crucial for achieving a smooth consistency without lumps.
2. Mixing Techniques for Smooth Consistency: In a large mixing bowl, beat the room temperature cream cheese with an electric mixer on medium speed until smooth and creamy. This usually takes about 2-3 minutes. Scrape down the sides of the bowl to ensure even mixing.
3. Incorporate the Sugar: Gradually add granulated sugar while continuing to mix. Beat until the mixture is light and fluffy, approximately 2 more minutes.
4. Add the Eggs: Add the eggs one at a time, mixing on low speed after each addition until just combined. Avoid overmixing, as this can introduce air bubbles that may lead to cracks during baking.
5. Stir in the Sour Cream and Vanilla: Finally, add the sour cream and vanilla extract. Mix until just combined, ensuring a homogeneous mixture without overbeating.
6. Optional Flour Addition: If you are using flour, add it at this stage. Gently fold the flour into the mixture with a spatula until no dry flour remains.
Your cheesecake filling is now ready for pouring onto the crust!
Baking the Cheesecake Bars to Perfection
Baking your cheesecake bars correctly is vital for achieving the perfect texture. Here’s how to do it:
The Baking Process
Preheat your oven to 325°F (163°C). Pour the cheesecake filling over the prepared crust, smoothing the top with a spatula. Bake in the preheated oven for 30-35 minutes. The cheesecake is done when the edges are set, and the center has a slight jiggle.
Tips for Monitoring Doneness
– Visual Cues: Look for the edges to be slightly puffed and the center to appear just a bit wobbly. This jiggle is normal and will firm up as the cheesecake cools.
– Gentle Cooling: After baking, turn off the oven and crack the door open. Allow the cheesecake to cool in the oven for about 1 hour. This gentle cooling process helps prevent cracks from forming on the surface.
Chilling and Preparing the Cherry Topping
Once your cheesecake bars are baked, the next step is to prepare the cherry topping. Chilling is essential for achieving the right consistency.
Importance of Chilling
Chilling the cheesecake bars for at least 4 hours, or preferably overnight, allows the flavors to meld together and the texture to set properly. This also makes slicing much easier.
Step-by-Step Instructions for Preparing the Cherry Topping
1. Combine Ingredients: In a medium saucepan, mix your cherry pie filling with 1 tablespoon of fresh lemon juice. The lemon juice brightens the flavor of the cherries and adds a refreshing touch.
2. Heat the Mixture: Place the saucepan over medium heat. Gently heat the cherry mixture, stirring occasionally until it’s warmed through. This should take about 5-7 minutes. Do not overcook, as you want the cherries to maintain their shape and texture.
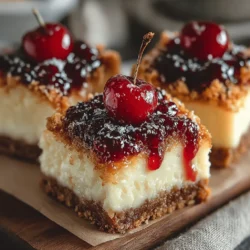
3. Garnishing Tips: For an elegant presentation, consider garnishing with fresh cherries. Simply rinse a handful of cherries, remove the stems, and arrange them on top of the cheesecake bars before serving.
Assembling and Serving the Cheesecake Bars
Now that your cheesecake bars are baked and chilled, it’s time to assemble and serve them.
Lifting and Slicing the Bars
– Lifting the Cheesecake: Use the parchment paper overhang to lift the cheesecake out of the pan gently. Place it on a cutting board.
– Slicing Instructions: With a sharp knife, slice the cheesecake into squares or rectangles. For clean cuts, wipe the knife with a damp cloth after each slice.
Presentation Tips for an Appealing Display
– Arrangement on a Platter: Arrange the cheesecake squares on a serving platter, spacing them evenly for an attractive presentation.
– Adding Fresh Cherries: For added elegance, place fresh cherries around the cheesecake bars or on top of each square. This not only enhances the visual appeal but also adds a burst of freshness with every bite.
Conclusion
Making creamy cherry cheesecake bars is a rewarding experience that combines simple ingredients and straightforward techniques. The joy of slicing into a perfectly set cheesecake, topped with vibrant cherry goodness, is truly unmatched. Whether you’re hosting a gathering, celebrating a special occasion, or simply indulging in a sweet treat, these cheesecake bars are an ideal dessert.
Their versatility allows for enjoyment year-round, adapting well to seasonal fruits or different flavor profiles. Encourage your friends and family to try this recipe for their next gathering, and watch as they marvel at the delicious results. With a little patience and the right techniques, you can create a dessert that delights the senses and leaves a lasting impression.